Viz Artist
Version 3.9.1 | Published December 13, 2017 ©
Create Transition Effects
This section details how to design custom transition effects for use with Viz Trio. The scene transition mechanism uses the GFX Channel Media Asset.
IMPORTANT! When creating these transition effects also refer to the User Manuals for the required Control Applications: Viz Trio, Viz Pilot, Viz Weather, etc.
Tip: The Dynamic textures may also be available as part of an already existing transition effect scenes in the dynamic folder (at root level).
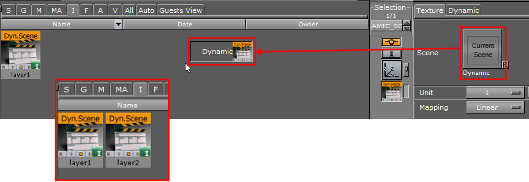
The Dynamic textures must be named layer1 and layer2. These are not ordinary images as they have the possibility to load into them an actual scene.
-
layer1: Represents the first scene.
-
layer2: Represents the scene to transit to.
It is possible to make any kind of animation, but there are a few design conventions to follow:
-
The scene should start with a full screen view of the dynamic texture layer1, and end with a full screen display of the dynamic texture layer2. Use the screen size section in the transformation editor to set the size of the texture container to fit the screen exactly
-
A transition scene is a scene that is created to move from one scene to the next in a dynamic way (not by cut)
Note: All scenes must be placed in a transitions folder in the scene database to make it visible in the control application.
This section contains the following procedures:
To Create Dynamic Textures
-
Add the Dynamic Scene Media Asset to the Scene Tree.

-
Open the Dynamic Scene properties Dynamic tab.
-
Configure the Dynamic tab properties as required.
-
Open the Transformation editor.
-
Set Screen Size to Screen.
-
Click Server.
-
Create a folder at the root level and name it dynamic.
-
Select the I (Image) tab.
-
Open the Dynamic Scene properties Texture tab.
-
Drag the Current Scene placeholder icon into the Server Panel.
-
Save as ‘layer1’.
-
Repeat steps 10 and 11 to create ‘layer2’.

-
Delete the DYNAMIC_SCENE container.
To Create a Transition Scene
-
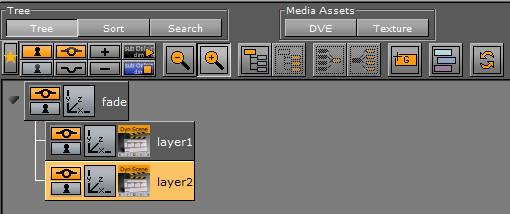
Add a group container to the Scene Tree.
-
Name the container fade.
-
Add the dynamic textures ‘layer1’ and ‘layer2’ as sub-containers to the fade container.
Note: There might not be images in the preview window, but only the bounding box.

-
Open the fade container Transformation editor.
-
Set Screen Size to Screen (resize the container to fit the whole screen).
Note: The scaling of the main group (fade) to screen size will make sure that the dynamic textures (layer1 and layer2) will be the correct full frame size.
-
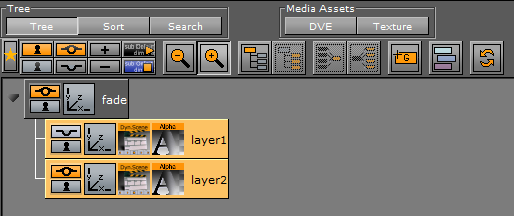
Add the Alpha plug-in to the layer1 and layer2 containers.

-
Built Ins -> Container plug-ins -> Global

-
-
Create a fade out animation for the layer1 container:
-
Click the Alpha plug-in icon.
-
Set the Alpha to 100%.
-
Click Set key.
-
Set the Alpha value to 0%
-
Click the Set key.

-
-
Create a fade in animation for the layer2 container:
-
Click the Alpha plug-in icon.
-
Set the Alpha to 0%.
-
Click Set key.
-
Set the Alpha value to 100%
-
Click the Set key.
Tip: In the Stage, place the time-line somewhere in the middle before the scene is saved as it usually gives the best representation of the transition effect.
-
-
Click Server.
-
Create a folder at the root level and name it transitions.
-
Save the scene to the transitions folder.
Tip: Transition scenes are commonly stored in a transitions scene folder at the root of the database directory structure.