Viz Pilot User Guide
Version 8.8 | Published September 25, 2023 ©
Import Components
Import components are used when importing playlists from newsroom systems and when creating macros to automatically fill templates. Imports can be executed manually or automatically with the use of scripts and macros.
It is good practice for scene designers to name the scene’s Field Identifiers using 01, 02, and 03 rather than 1,2,3,4 ... 11,12 and so on. Using 1,2,3,4 will cause data to be assigned to the wrong fields when using Import components since the Media Sequencer will place 11 and 12 before 2 and so on.
This section contains the following topics:
Story Importer Component
![]()
Using TStoryImporter, a template can be either manually or automatically filled using a macro or by importing an external data source (XML).
When filling a template, a template is specified with an External ID and data is added to the template. The order in which the data is filled is defined by the order of the ControlObjectName property which refers to the Field Identifier set by the scene designer.
This section contains the following topics:
External ID

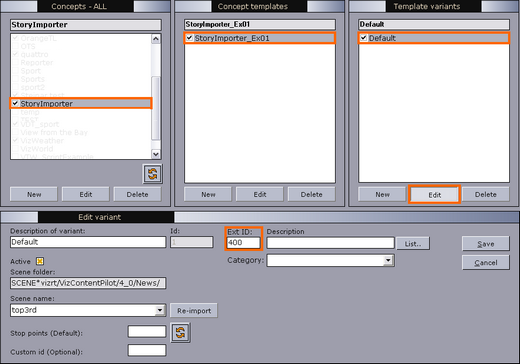
When created, a template is saved and typically added to a concept. In Template Manager, the template can be given an external ID (see Variants) for use with Import components.
This ID is then used when creating data elements by triggering macros in Director, adding playlists to Director manually from newsroom systems (see Create a macro using External IDs in Director). External IDs are also used with newsroom systems that create data elements based on *cg commands; however, Import component does not support this workflow.
XML Example
The XML example below contains the name of the playlist, a group and three elements with an External ID (templateID). The XML playlists are generated by newsroom systems, and manually imported by Director’s XML Filler.
<?xml version="1.0"?><playlist> <name>Name of playlist</name> <group visible="true" name="Group name"> <event createType="CreateDataElement"> <templateID>110</templateID> <dataName>Data Element 001</dataName> <comment/> <data> <field>🌟</field> <field>آخر النهر</field> <field>Star</field> </data> </event> <event> <templateID>110</templateID> <dataName>Data Element 002</dataName> <comment/> <data> <field>💫</field> <field>Pleione</field> <field>Binary star</field> </data> </event> <event createType="CreateDataElement"> <templateID>110</templateID> <dataName>Data Element 003</dataName> <comment/> <data> <field>✨</field> <field>Ταύρος</field> <field>Constellation</field> </data> </event> </group></playlist>Script Example

The component triggers its OnStoryDataW event to start filling the template with Data.
Sub StoryImporter1StoryDataW(Sender, Data) if Data.Count > 0 then TWUniEdit1.Text = Data.Strings(0) SetUnicodeValue TWUniMemo1, Data.Strings(1) SetUnicodeValue TWUniMemo2, Data.Strings(2) end ifEnd subNote: From Viz Pilot 8.2, OnStoryDataW should be used instead of the old OnStoryData event, as OnStoryDataW handles Unicode better.
Creating a Macro Using External IDs in Director
-
Start Director.
-
On the Options menu select Keyboard Configuration... .
-
Select and right-click the macros category, and from the context menu select Add Macro... .
-
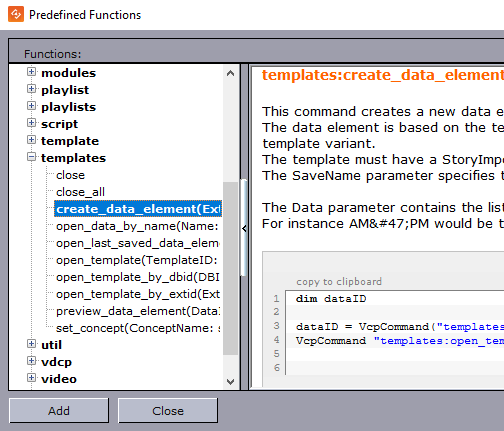
Click Show Macros... to open the Predefined Functions window.
-
Select the create_data_element function under templates.

-
Click the hyperlink named copy to clipboard, and click Close.
-
In the New Macro Shortcut window select the VBScript tab, and paste the newly copied script into the script editor.
-
Edit the script.
dim dataIDdataID = VcpCommand("templates:create_data_element400MyNewElement Headline/Title/Designation")VcpCommand"templates:open_template -1 "& dataIDNote: The number 400 represents the external ID added in Template Manager. MyNewElement is the name of the template, and Headline, Title and Designation are data that will be filled into the template by the template script.
-
Select the Enter Key field, and press the key combination for the macro.
-
Enter a Macro Name, and click OK.
Creating Data Elements Based On External IDs
-
In Director press the newly assigned key combination to trigger the macro (see Script Example).
-
Enter the information required.
-
Click the Save button to save it as a data element.
-
Add the data elements to the playlist.
Using a Script to Control Data Filling in the Template

-
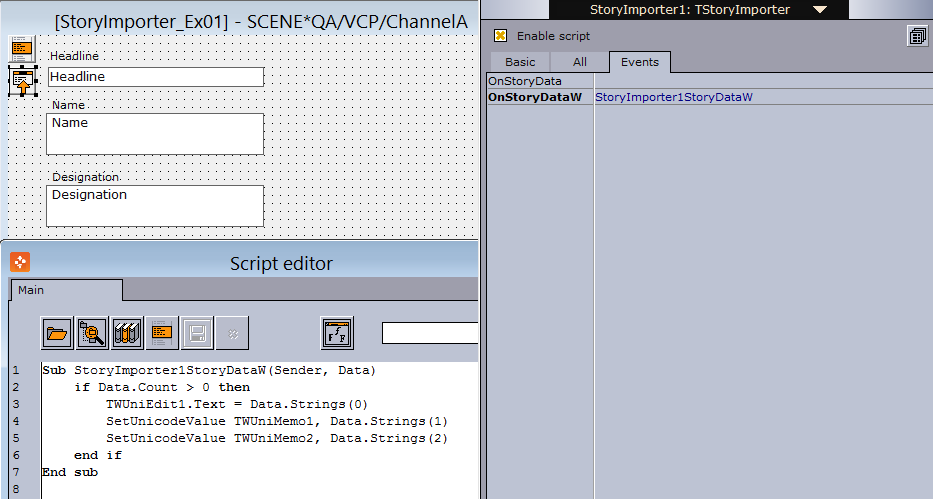
In Template Wizard, open the Object Inspector and check the Enable script option to enable scripting (CTRL+F12).
-
Add the TStoryImporter component to the template (select the Import category from the dropdown).
-
Select the TStoryImporter component in the template. Click Events in the object inspector and double click the OnStoryDataW event.
-
Set the body of the newly created event handler like this:
Sub StoryImporter1StoryDataW(Sender, Data)ifData.Count >0thenTWUniEdit1.Text = Data.Strings(0)SetUnicodeValue TWUniMemo1, Data.Strings(1)SetUnicodeValue TWUniMemo2, Data.Strings(2)endifEnd sub
Note: From Viz Pilot 8.2, OnStoryDataW should be used instead of the old OnStoryData event, as OnStoryDataW handles Unicode better.
Direct Story Importer Component
The TDirectStoryImporter component is used for fetching template data from external sources such as XML files. This is similar to the Story Importer Component; however, the Direct Story Importer component is different in that it has an editor for mapping template text fields to index IDs, and is therefore easier to use without scripting. If advanced scripting is needed, the Story Importer Component component is recommended.
To understand the logic and use of the component in Director, see Story Importer Component.
Notable Properties
-
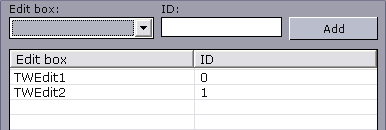
StoryActions: Opens the Story Actions Editor for linking text fields to index values.
Using the TDirectStoryImporter Component
-
Add the TDirectStoryImporter component from the Import component palette to the template.
-
Click the ellipse (...) button to open the Story Actions Editor.

-
Link edit fields to index values so that they correspond with the sequence of data coming from the external system.

-
Click OK.
-
Save the template.