This section covers the following topics:
Playlist Pane
When the playlist is active, you can double-click an item to bring up the template/form where you can fill out information and/or take the item to air. Drag items to rearrange them or add them to groups.
Right-click an item to bring up the playlist shortcut menu:
Stop or Pause the video.
Cue: Prepares the clip for playout so the first frame is ready in the player.
Cue Append: Prepares the clip for playout. The clip will start automatically when the current clip ends.
Take: Performs a direct take on the selected page.
Continue: Continues the playout of an element.
Take Out: Takes the element out (hard cut).
Read: Reads the element.
Prepare: Prepares the clip in the pending player without affecting the current clip, so it is ready to be played out. The clip will not start automatically after the current clip. Requires Viz Engine 3.3 or later.
Initialize Playlist or Initialize Element.
Cleanup: Cleans up all renderers that have an item in the current playlist by clearing all loaded graphics from memory for those channels. To clear all renderers, go to the Main Menu > Viz Engine Menu > Cleanup Renderers
Schedule Playlist: Activates the playlist. For example, if Begin time has been set, the playlist must be scheduled before the changes take effect.
Stop Playlist: Stops a previously scheduled playlist.
Set external GPI cursor: Sets the external cursor for a selected element. The cursor indicates the element that will be taken if a “take and advance” General Purpose Input (GPI) action is executed, for example.
Auto Preview: Automatically enables preview of next element from selected.
Sync with Program Channel: Syncs the preview with what’s showing on the program channel. For example, if you have a lower third on the preview and are showing a fullscreen video on the program channel you can see them together in the preview.
Configure VDCP: Opens the Video Disk Control Protocol (VDCP Tab).
Remove: Deletes selected items.
Create Group: Creates a new group. The new group will be created above the currently selected item. Groups cannot be created when multiple items are selected.
Tree: Organizes the elements in the current playlist and changes the font used.
Tip: Right-click the column headers and select Store as Default to use these settings and to set layout preferences for all new playlists. See Playlist Columns for more information.
Playlist Cursors
A cursor visibly indicates any item being acted on in a playlist. When a playlist is active and playing, the current item playing will be indicated by a green arrow.
When GPI is enabled, the external GPI system’s cursor will be displayed in any client that is using the same profile as the external system. The red arrow indicates which item is next in the playlist according to the external automation system.
Playlist Tool Bar
Stop video, if running. Icon active (dark black) if video running.
Pause video, if running. Icon active (dark black) if video running.
Cue: Prepares the clip for playout so the first frame is ready in the player.
Direct Take: Performs a direct take on the selected page.
Continue: Continues the animation on the selected page, or any that is loaded in the same transition logic layer as the selected page.
Take out the selected page, or any that is loaded in the same transition logic layer as the selected page.
Init (initialize) playlist: Loads the playlist on the program and preview renderer.
Init (initialize) selected: Loads selected pages on the program and preview renderer.
CleanUp on the Viz Engine renderer (both visible and loaded memory content).
Concept: Selects the required Concept for the playlist.
Using Playout Mode
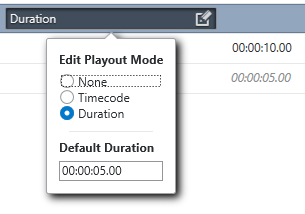
Playout Mode can be selected as a playlist column. Playout Mode specifies how groups should be played out and the different options are available using the Playout Mode column drop-down menu. The user can choose between three options: None, Duration and Timecode.
Timecode is the default option. The time is set in the Timecode column. Timecode indicates that an element should be played out relative to the parent group or video.
When Duration is selected, elements of the group will be played out one after the other, each staying on air for the amount of time that is specified in the Duration column. It is possible to set a default duration for items without an explicit duration at the bottom of the Playout Mode drop-down menu. The duration of items using this default value will be shown in italics and grayed out in the duration column. However, they can still be edited by first selecting the item row and then clicking the duration value.
Default duration fields will not appear for the other Playout Mode options.
Note: The default duration functionality is supported using Media Sequencer 5.0 and later.
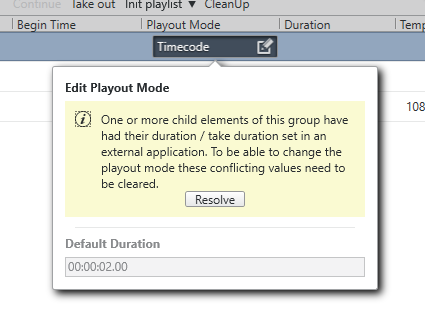
Info: Depending on the selected playout mode for the containing group, the duration column will show one of two different underlying values for each element, internally called duration and take_duration. When playout mode is Duration, the column will show the value called duration, otherwise take_duration. However, regardless of the playout mode, both values might exist in the Media Sequencer at the same time; for example, if set in an external application or a previous version of Director. In such cases, duration will only have an effect if the playout mode is Duration, while take_duration is always considered when taking an element. Regardless of how the element is taken on air, it will be taken out after that time if it has take_duration set. Since the interface only shows one of these values, having both set might lead to unexpected results. Such conflicts must therefore be resolved by clicking the Resolve button that is shown in this state. This will remove the instance of duration and take_duration that is not currently visible on the interface.
To enable looping of a group, the Playout Mode must be set to Duration before the Loop column is toggled on. The duration must be set on all elements in the Duration column. Remember to use the Stop button in the Playlist Tool bar in order to stop the loop.
The None option means that there will be no playout.
There are other options besides None, Duration and Timecode that may be shown in this column. These are the result of playout modes set in other applications that are not recognized by Director. To help avoid accidental changes that cannot be undone through the interface, Director does not allow the playout mode to be changed while such an unknown mode is active.
Note: Nested carousels (groups with playout mode of Duration) are not supported.
Playlist Filter and Filter Editor
Use the Filter option to filter what items the playlist will show. You can create as many filters as required with the New option, and existing filters can be edited or deleted. When you have created a filter, simply select the filter to use in the drop-down list. Any items that do not satisfy the filter selected will be hidden from display, and not deleted. Deselect filtering to show all items.
In the example below a filter is created that only shows items in the playlist where the description contains the word Mosart:
Use the drop-down entries and check-boxes to create a filter as required, based on the template attributes.
Note: To filter by the category assigned to the template, you must select Subcategory in the drop-down menu. This selection will list all categories created using the Template Wizard client to help filter data elements assigned to a given category. See also Categories and Channels.
Playlist Search
Search the playlist. This is a simple search, not a filter. Go to the next match by pressing Enter.
Thumbnail View
Change the thumbnail size.
Playlist Status
If there is a VDCP handler for the playlist in the Media Sequencer, this button will display the status. Click the button to set the playlist to active/inactive.


