Creating and Deleting a Space
Creating a Space
To create a new Space
Either
Click the blue button + New Space button on the top right of the Space list page

or
Click on the big + (Plus sign) within a box if you are using the box view.
Choose your template.
The template determines which apps can be deployed.
Note: Refer to the Viz Now Administrator Guide for more details about Templates.

Click the Question mark
 to open instructions for the template.
When the Space is created select which apps should be part of the Space by clicking the Add Apps menu.
From the popup menu the available apps can be selected.
When the all required apps are selected, click Deploy.
This starts the building the application on your account.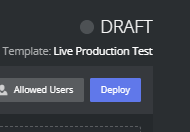
The operation takes 10-15 minutes.
Deleting a Space
A space that has been created and deployed incurs costs. Instances that are running are much more costly than when they are off. However there are still charges for instances that are off, especially if they have large disks.
It is therefore recommended that instances are destroyed when they are no longer in use.
Note: You must first perform a Delete all before a deployed space can be deleted.
Delete all: All virtual instances that Viz Now has deployed are deleted from the Cloud Account.
All configurations are lost but the space itself is not yet deleted from Viz Now database.Delete: The space is deleted from the Viz Now database.
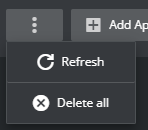
To delete all content deployed in a Space
This removes all virtual machines and storage. Make sure you have saved any work elsewhere before doing this.
Open the space you want to delete (must be Deployed).
From the Three dots menu, select Delete all.
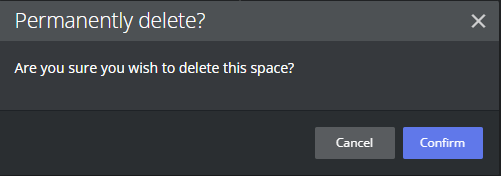
A popup box warns about permanent actions.
Type in the requested keywords to confirm the action.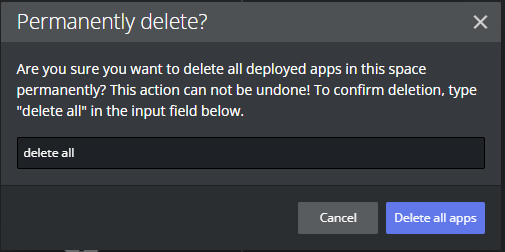
To delete a Space
To completely delete the Space references from Viz Now, select Delete (available if the Space is in Draft mode).
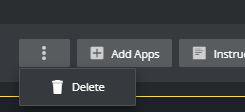
Confirm the deletion, in the popup
Session Scheduling
Viz Now users with Editor or Administrator roles can define their spaces’ up-time. This feature ensures that the apps are accessible during specific hours on designated days and helps prevent unexpected costs that may arise from users forgetting to turn off their apps.
This feature covers all apps within a space, it does address the individual apps in a space.
Both assigned users and the space owner receive a notification 30 minutes prior to Viz Now forcibly shutting down the apps.
This advance notice is intended to provide users with ample time to manually shut down their systems, the recommended course of action.
Start and End Times
By predetermining the activation and deactivation time of a space, users can plan in advance exactly when the space should be operational or not available.
To schedule space start time and end time
Navigate to the target Viz Now Space for scheduling.
From the Scheduler settings menu, fill-in the checkbox Schedule session.
Select Start time and End time by clicking the Calendar icon.
The estimated shutdown time is displayed.Click Confirm to apply your settings.
Auto-Shutdown
An unused space that is still running, generates unnecessary operating costs on the users' AWS account. Auto-shutdown provides an optional safeguard to autonomously place unused resources offline.
Users can:
Specify the duration that a Space is expected to remain active.
Optionally enable the advanced auto-detect feature Shutdown only when inactivity is detected over 30 minutes, for added security.
When this feature is activated, the instance remains operational until there is no outgoing data detected for 30 minutes.If there are no active streams or remote connections to the app within this timeframe, the system will automatically shut down.
This helps ensure that the instance does not power-off while still in use.
To schedule auto-shutdown
Users that will only run Apps for a certain amount of hours, can configure the Auto-shutdown feature. This feature initiates a stopwatch after the last App is turned on and then turns off everything after the chosen time elapses.
Navigate to the target Viz Now space.
From the Scheduler settings menu, fill-in the checkbox Enable auto-shutdown.
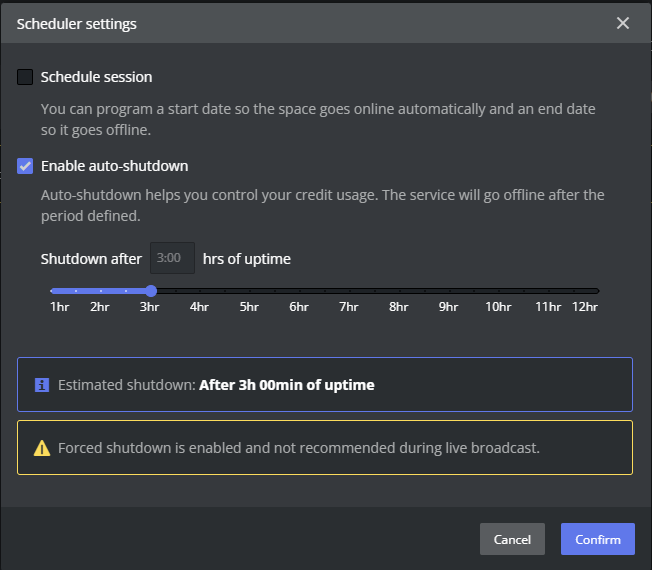
In section Shutdown after n:nn hrs of uptime, use the slider to specify how many hours your space is expected to run.
The estimated shutdown time is displayed.Optionally enable the Shutdown only when inactivity is detected over 30 minutes safeguard option mentioned above.
Click Confirm to apply your settings.
Note: It is advised to avoid using this option during a live broadcast, to prevent unexpected shutdowns if the show runs longer than anticipated.
AWS Tags
For each Space, it is possible assist Space management by adding tags. The various types of tag are described below:
All tags are applied as AWS Tags on all resources deployed by Viz Now.
AWS Tags are key-value pairs that can be attached to AWS resources, providing a flexible way to manage, organize, and track costs.
AWS Tags facilitate efficient resource filtering and discovery, enhancing operational efficiency.
In AWS, tag policies enforce consistent tagging across resources, which is crucial for regulatory compliance and effective resource management and cost tracking.
Note: The Organization Administrator can define mandatory Tags to comply with AWS Tag Policies and ensure that specific tags are always included.
See the Viz Now Administrator Guide, section Organization.
Custom Tags
Adding custom tags to a Space enables distinguishing a particular Space from other resources. It also clarifies what the Space is used for.
To add a custom tag
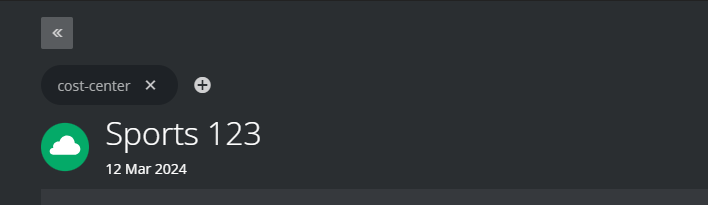
In the required Space, click the Plus sign above the heading for the Space.
Enter the Tag name and click
 or press Enter.
(Optional) Provide a value if required.
To add the new tag, click
 .
.Once the Tag is added, a redeploy is required to add the Tag to any existing AWS resources.
The Tag is highlighted until this is done.
Mandatory Tags
If your administrator has marked an Organization Tag as mandatory, it will appear in all new Spaces. It is not possible to remove this tag and there is no 'X' button to remove it. However, you add values to it.
To select values for a mandatory Tag
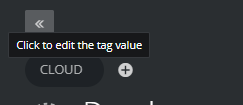
Click on the required tag.
Enter a value and save by clicking
or pressing Enter.
Organization Tags
Organization tags that have been created by an Administrator, appear as selectable suggestions.
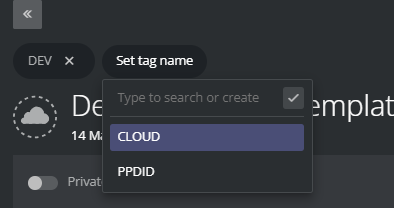
To add organization tags to a Space
Simply select them from the list to add.
Cost Allocation Tags
Cost allocation tags are labels that you or AWS assign to an AWS resource. Each tag consists of a key and a value.
These tags enable you to organize your resources and track costs on a detailed level.
There are two types of cost allocation tags:
AWS-generated tags: These are created by AWS or AWS Marketplace ISVs for you and are prefixed with "aws:".
User-defined tags: You can add these tags yourself through Viz Now, as described above.
Why use Cost Allocation Tags?
Accountability: Allocate costs to those responsible for the resource usage.
Financial transparency: Provide clear visibility into cash allocations toward IT spending.
Informed IT investments: Track ROI based on projects, applications, or business lines.
How Do Cost Allocation Tags Work?
After activating cost allocation tags, AWS organizes your resource costs on a cost allocation report.
This report groups your usage and costs based on your active tags.You can apply tags that represent business categories (for example, cost centers, application names) to organize costs across services.
Example Scenario:
You tag two Amazon EC2 instances:
Cost Center: Engineering
Stack: Production
You have an AWS-generated tag: createdBy (that tracks who created the resource)
The cost allocation report will show costs associated with these tags.
Note: Cost allocation tags enhance cloud accountability and empower better decision making.
Activate them to gain insights into your AWS costs.
Read more about this topic here: Using AWS cost allocation tags - AWS Billing (amazon.com)