Graphic Hub Administrator Guide
Version 3.3 | Published March 12, 2019 ©
Journal Panel
From the Journal panel it is possible to search for journal entries and view their details. Journal entries are log files created according to various alert levels.
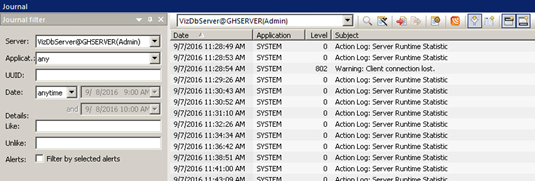
The Journal is a good place to start for troubleshooting problems encountered in Graphic Hub. The Journal records all server activities. When faced with troubleshooting scenarios, the journal is a good place to search for clues. The activities logged in the journal are the creation, modification and deletion of objects in Viz Artist, as well as other information messages, warnings, errors and deploy task information.
This page contains the following topics:
Journal Tool Bar

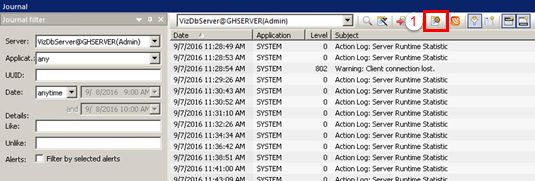
The Journal tool bar (1) has these options:

-
 Search: Search for journal entries based on the preferences defined in the Journal Filter frame
 -
 Optimize search for faster export: If enabled, backup files with a large number of journal entries are optimized for export, by not containing all available information about these entries
 -
 Import journal entries: Opens a dialog box, from where it is possible to select an XML journal backup file to import
 -
 Export selected entries: Allows you to export only the entries that you choose
 -
 Backup task: Opens the Configure Journal Backup Task window
 -
 Switch to feed mode: Allows you to receive journal updates in real time
 -
 Show/hide entry properties: Shows/hides the Journal Properties frame
 -
 Show filter: Shows/hides the Journal Filter frame
Search the Journal
To View the Journal
-
Click Server > Administer journal entries.
To Search the Journal with Filter Settings
-
Open the Journal panel.
-
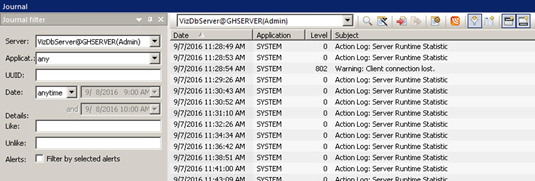
In the Journal filter, from the Server drop down box, select a server.
-
Select an application. Your options are:
-
Any: Searches System and GH Deploy.
-
System: Graphic Hub Server. Any work done on Graphic Hub is logged in the system.
-
GH Deploy: All Graphic Hub Deploy Agent tasks, successful or failed, plus warnings and other pertinent information, are logged in the journal.
-
-
Optionally, enter a UUID of a folder or file.
Note: Adding a UUID to the search criteria may provide hints toward finding and resolving corrupted files.
-
From the Date drop down box, select one of the following options:
-
Anytime
-
From: Selecting this option prompts you to also enter a beginning date and time
-
Until: Selecting this option prompts you to also enter an ending date and time
-
Between: Selecting this option prompts you to also enter a beginning and ending date and time
-
-
In the Details Like field, enter free text like name of the task, name of the agent, or any description that may figure in the task.
-
In the Details Unlike field, enter free text like name of the task, name of the agent, or any description that you want to exclude from the task search.
-
Check the Alerts check box if you wish to filter by selected alerts. There are various Action Logs, information messages, warnings and errors to choose from.
-
Optionally, click Optimize Search (2) for Faster Export button.
-
In the Journal, click the Search (1) button.

The search results are shown in the panel below. When one is selected, the details are shown in the panel to the right.
To View a Live Feed of Server Activities
-
Search in the Journal with Filter Settings.
-
In the Journal tool bar, click the Feed button (1).
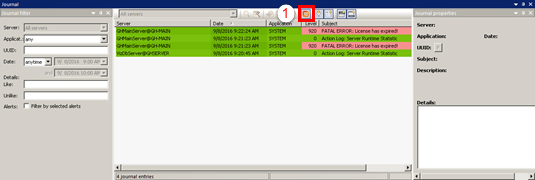
The journal is updated in real time.
-
Green: New journal entries.
-
Yellow: Warnings.
-
Red: Errors.
Only the Level and Subject columns are colored in red or yellow when there are warnings and errors to report
Automatic Journal Backup
To automatically backup all Journal entries, Enable journal backup must be enabled in Journal/Logging Settings.
IMPORTANT! Once an automatic backup task has completed, all journal entries are deleted.
To Schedule Automatic Journal Backup
-
Open the Journal panel: Click Server > Administer journal entries.
-
-
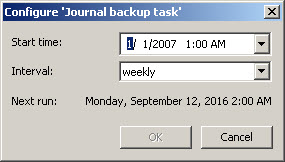
Click the backup task (1) button.
-
Set the Start time.
Tip: Click the drop-down or highlight a date number and change it, to set the date. Click on the hour or minutes to change the time.
-
Set a frequency Interval.
-
In the Graphic Hub Terminal, check that Enable journal backup is enabled under Options > Journal/Logging settings. This option is enabled by default.
-
Click OK.
Export and Import of Journal Entries
With the export of journal entries select one, or as many as required, entries to be exported. Exported journal entries can be imported by other users for help with troubleshooting.
To Export Selected Journal Entries
-
Search in the Journal with Filter Settings.
-
In the journal, select the entries to be exported.

Tip: Press Ctrl+A to select all entries.
-
Export the selected entries by clicking the export button
 , or by right-clicking the selection and select Export Selected.
 Note: From the context menu, Export and Delete Selected can also be selected. This frees up disk space and increase performance.
-
Select a location, optionally enter a file name.
-
Click Save.
To Import Journal Entries
-
Open the Journal panel: Click Server > Administer journal entries.
-
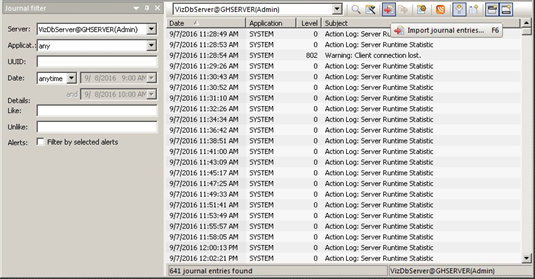
Click the Import Journal Entries
 button.
-
Select the required file.
-
Click Open. The file is loaded into the journal.
